
React JS is a JavaScript library used for building user interfaces, especially for single-page applications. It was developed by Facebook and it helps in creating fast, interactive, and reusable UI components.
It uses a concept called Virtual DOM which improves the performance of web applications. React follows a component-based architecture, which means the UI is built by combining small reusable pieces.
✅ Advantages of React JS:
1. Reusable Components – We can reuse components across different parts of the application, which makes development faster and more organized.
2. Virtual DOM – React updates only the changed parts of the UI, which improves performance.
3. Fast Rendering – It makes apps faster and smoother because of its efficient updating process.
4. Strong Community Support – Since it's maintained by Meta (Facebook) and the community, we get regular updates, tools, and third-party libraries.
5. SEO Friendly – Compared to some other JS frameworks, React can be more SEO-friendly when used with SSR (like Next.js).
6. One-Way Data Binding – Makes data flow more predictable and easier to debug.
❌ Disadvantages of React JS:
1. JSX Learning Curve – JSX syntax might be confusing for beginners as it mixes HTML with JavaScript.
2. Too Many Choices – React is just the "V" in MVC. So we have to choose routing, state management, and other tools separately.
3. Frequent Updates – React and its ecosystem change often, which can be hard to keep up with.
4. Boilerplate Code – For simple tasks, sometimes we need to write too much code.
React JS একটি JavaScript লাইব্রেরি, যা মূলত ইউজার ইন্টারফেস (UI) তৈরি করার জন্য ব্যবহার করা হয়। এটি Facebook দ্বারা তৈরি করা হয়েছে। এটি সিঙ্গেল পেজ অ্যাপ্লিকেশন (SPA) তৈরি করতে খুবই উপযোগী এবং দ্রুত, ইন্টার্যাকটিভ ও পুনর্ব্যবহারযোগ্য কম্পোনেন্ট তৈরি করতে সহায়তা করে।
React এ Virtual DOM ব্যবহৃত হয়, যা অ্যাপ্লিকেশনের পারফর্মেন্স উন্নত করে। এটি একটি component-based architecture অনুসরণ করে, যেখানে UI ছোট ছোট reusable কম্পোনেন্ট দিয়ে তৈরি হয়।
✅ React JS-এর সুবিধা:
1. Reusable Components – একবার তৈরি করা কম্পোনেন্ট বারবার ব্যবহার করা যায়, এতে সময় বাঁচে এবং কোড পরিষ্কার থাকে।
2. Virtual DOM – শুধুমাত্র পরিবর্তিত অংশ আপডেট হয়, ফলে পারফর্মেন্স ভালো হয়।
3. Fast Rendering – ইউআই দ্রুত রেন্ডার হয়, ফলে ইউজার এক্সপেরিয়েন্স ভালো হয়।
4. Strong Community Support – Meta এবং কমিউনিটি মিলে ভালো সাপোর্ট, লাইব্রেরি ও আপডেট দেয়।
5. SEO Friendly – SSR (যেমন Next.js) ব্যবহার করলে React অ্যাপ SEO ফ্রেন্ডলি হয়।
6. One-Way Data Binding – ডাটা ফ্লো সহজ ও ডিবাগিং সুবিধাজনক হয়।
❌ React JS-এর অসুবিধা:
1. JSX শেখা কঠিন হতে পারে – HTML আর JS একসাথে লেখা নতুনদের জন্য কনফিউসিং হতে পারে।
2. সব কিছু আলাদাভাবে সেটআপ করতে হয় – React শুধু UI তৈরির জন্য, তাই রাউটিং, স্টেট ম্যানেজমেন্ট ইত্যাদি আলাদাভাবে নিতে হয়।
3. বারবার আপডেট হয় – নতুন ফিচার আর লাইব্রেরির কারণে সবসময় আপডেট থাকতে হয়, যা ঝামেলার হতে পারে।
4. বেশি কোড লিখতে হয় – সহজ কাজেও অনেক boilerplate কোড লিখতে হয় অনেক সময়।
I would select React JS because it is efficient, scalable, and developer-friendly. It allows me to build reusable components, which helps in keeping my code clean and organized. React also offers high performance through its Virtual DOM, which makes updates faster and smoother for the user.
Another reason is its strong ecosystem and community support. There are lots of ready-to-use libraries and tools available. Also, React works very well with modern frameworks like Next.js, which gives me the power to handle server-side rendering (SSR) and improve SEO.
In short, I prefer React because it makes front-end development faster, more maintainable, and future-ready.
আমি React JS বেছে নেব কারণ এটি দ্রুত, স্কেলযোগ্য এবং ডেভেলপার-ফ্রেন্ডলি একটি লাইব্রেরি। এর মাধ্যমে আমি reusable components তৈরি করতে পারি, যেটা কোডকে পরিষ্কার ও মেইনটেইনযোগ্য রাখে। React-এর Virtual DOM ব্যবহার করে ইউজার ইন্টারফেস খুব দ্রুত আপডেট হয়, ফলে পারফর্মেন্স অনেক ভালো হয়।
আরো একটি গুরুত্বপূর্ণ কারণ হলো এর বড় কমিউনিটি ও ecosystem। প্রচুর লাইব্রেরি ও টুলস সহজেই পাওয়া যায়। এছাড়া, React Next.js এর মতো আধুনিক ফ্রেমওয়ার্কের সাথে খুব ভালোভাবে কাজ করে, যা SEO এবং Server-Side Rendering (SSR) এর সুবিধা দেয়।
সংক্ষেপে বললে, React JS ব্যবহারে আমি ফ্রন্টএন্ড ডেভেলপমেন্টকে দ্রুত, সহজ এবং futuristic করতে পারি।
Virtual DOM (V-DOM) is a lightweight copy of the real DOM (Document Object Model) used in React. It is not shown on the screen but exists in memory. When we update the UI, React first updates the Virtual DOM instead of the Real DOM. Then, it compares the updated Virtual DOM with the previous version using a technique called diffing. After that, it updates only the changed parts in the Real DOM. This process makes the application faster and more efficient.
ভার্চুয়াল DOM হলো Real DOM-এর একটি হালকা ভার্সনের কপি, যেটা ব্রাউজারে দেখা যায় না, শুধু মেমোরিতে থাকে। যখন UI তে কোনো পরিবর্তন হয়, React সরাসরি Real DOM এ পরিবর্তন করে না। বরং, প্রথমে Virtual DOM আপডেট করে এবং আগের ভার্সনের সাথে তুলনা করে (diffing নামে পরিচিত)। এরপর শুধুমাত্র যেসব অংশে পরিবর্তন হয়েছে, সেগুলা Real DOM-এ আপডেট করে। এই পদ্ধতি অ্যাপ্লিকেশনকে দ্রুত এবং কার্যকর করে তোলে।
ভার্চুয়াল DOM হলো Real DOM-এর একটি হালকা ভার্সনের কপি, যেটা ব্রাউজারে দেখা যায় না, শুধু মেমোরিতে থাকে। যখন UI তে কোনো পরিবর্তন হয়, React সরাসরি Real DOM এ পরিবর্তন করে না। বরং, প্রথমে Virtual DOM আপডেট করে এবং আগের ভার্সনের সাথে তুলনা করে (diffing নামে পরিচিত)। এরপর শুধুমাত্র যেসব অংশে পরিবর্তন হয়েছে, সেগুলা Real DOM-এ আপডেট করে। এই পদ্ধতি অ্যাপ্লিকেশনকে দ্রুত এবং কার্যকর করে তোলে।
In React, both props and state are used to manage data, but they work differently.
Props are used to pass data from a parent component to a child component. Props are read-only — that means the child component cannot change them. The parent controls the data.
On the other hand, state is a local data storage inside a component. It is used to handle dynamic changes like user inputs, toggles, or counters. State is mutable, meaning we can change it using hooks like `useState`. When state changes, the component re-renders.
So in short:
* Props are passed from parent to child and cannot be changed by the child.
* State is managed and updated inside the component itself.
React-এ props আর state—দুটোই ডাটা ম্যানেজ করার জন্য ব্যবহৃত হয়, কিন্তু এদের কাজ আলাদা।
Props মানে হচ্ছে properties, যেটা parent component থেকে child component এ ডাটা পাঠানোর জন্য ব্যবহৃত হয়। Props read-only, মানে child component এটাকে পরিবর্তন করতে পারে না। কন্ট্রোল থাকে parent এর হাতে।
অন্যদিকে, state হলো component এর নিজস্ব data, যেটা সে নিজে manage এবং update করে। যখন state চেঞ্জ হয়, তখন component আবার render হয়। আমরা সাধারণত `useState` এর মাধ্যমে state ব্যবহার করি।
সংক্ষেপে বললে:
* Props parent থেকে আসে, child শুধু ব্যবহার করে।
* State component নিজে রাখে এবং প্রয়োজনে চেঞ্জ করে।
The `useState` hook is used in React functional components to create and manage local state.
In simple terms, if I need to store some data inside a component that can change over time, I will use `useState`. For example, counting a number, showing or hiding a dropdown, or handling user inputs — all these need state.
When I call `useState`, it returns two things:
1. The current value of the state
2. A function to update that state
So, whenever the state is updated, React automatically re-renders the component to reflect the latest value on the UI.
I will use `useState` when:
* I need to store and update values inside a component
* The value may change based on user actions or internal logic
* I want the component to re-render when the value changes
This is one of the most commonly used hooks in React for dynamic UI.
`useState` হচ্ছে React-এর একটি hook, যেটা আমরা functional component এর ভিতরে local state তৈরি ও ম্যানেজ করার জন্য ব্যবহার করি।
সহজভাবে বললে, যদি আমি component-এর ভিতরে এমন কোনো ডাটা রাখতে চাই যা পরিবর্তিত হতে পারে, তখন আমি `useState` ব্যবহার করব। যেমন: কাউন্টার ভ্যালু, বাটন ক্লিক করে কিছু দেখা বা লুকানো, ইনপুট ফিল্ডের ভ্যালু — এগুলা সবই state দিয়ে হ্যান্ডেল করতে হয়।
`useState` ব্যবহার করলে আমি দুইটা জিনিস পাই:
1. বর্তমান state এর ভ্যালু
2. সেই state আপডেট করার একটা ফাংশন
যখনই state আপডেট করি, React কম্পোনেন্টকে আবার রেন্ডার করে, যাতে নতুন মান UI-তে দেখা যায়।
আমি `useState` ব্যবহার করব যখন:
* Component-এর ভিতরে ডাটা সংরক্ষণ ও পরিবর্তন করতে হবে
* ইউজারের action এর উপর ভিত্তি করে ডাটা চেঞ্জ হতে পারে
* চেঞ্জ হওয়ার সাথে সাথে UI-ও আপডেট হওয়া দরকার
এটি React-এর সবচেয়ে গুরুত্বপূর্ণ ও সবচেয়ে বেশি ব্যবহৃত hook গুলোর একটি।
The Context API in React is a built-in feature that allows us to share data globally across components without passing props manually at every level.
Normally in React, if I want to pass data from a parent to a deeply nested child component, I have to pass it through every middle component as props. This is called "prop drilling", and it can make the code messy.
To solve this, React introduced the Context API. With Context, I can create a context object and wrap my component tree with a provider. Then, any child component inside that tree can directly access the data using the `useContext` hook — no need to pass props step-by-step.
🔧 How it works
1. First, I create a context using `createContext()`.
2. Then, I wrap my component tree with a `Context.Provider` and pass the value I want to share.
3. Any component inside can then use `useContext(MyContext)` to access the shared value.
This is very useful when we need to share auth info, themes, user roles, language settings, or other global states.
Context API হলো React-এর একটি built-in system, যা দিয়ে আমরা কোনো ডাটা একাধিক কম্পোনেন্টে শেয়ার করতে পারি—তাও আবার props না পাঠিয়েই।
সাধারণভাবে, যদি আমি কোনো ডাটা parent থেকে deep child পর্যন্ত পাঠাতে চাই, তাহলে আমাকে সেই ডাটা প্রতিটি কম্পোনেন্টে props হিসেবে পাঠাতে হয়। একে বলে prop drilling, এবং এটা কোডকে জটিল করে তোলে।
এই সমস্যা সমাধানের জন্য React-এ এসেছে Context API। এর মাধ্যমে আমি একটা context তৈরি করি এবং পুরো কম্পোনেন্ট tree কে একটি provider দিয়ে ঘিরে ফেলি। এরপর ভিতরের যেকোনো কম্পোনেন্ট সহজে সেই ডাটা useContext দিয়ে নিতে পারে।
🔧 কাজ করার পদ্ধতি:
1. প্রথমে `createContext()` দিয়ে একটা context তৈরি করি।
2. তারপর `Context.Provider` দিয়ে আমার কম্পোনেন্ট গুলা ঘিরে ফেলি এবং যেটা শেয়ার করতে চাই সেটা value হিসেবে দেই।
3. যেকোনো চাইল্ড কম্পোনেন্ট `useContext(MyContext)` ব্যবহার করে সেই value অ্যাক্সেস করতে পারে।
এটা বিশেষভাবে কাজ দেয় যখন আমাকে auth info, theme, language, বা user role এর মতো ডাটা অ্যাপজুড়ে শেয়ার করতে হয়।
The purpose of the `useEffect` hook in React is to handle side effects in a functional component.
Side effects mean anything that happens outside the normal flow of rendering — for example:
* Fetching data from an API
* Setting up event listeners
* Updating the document title
* Running timers
* Or even cleaning up resources when a component unmounts
In class components, we used lifecycle methods like `componentDidMount`, `componentDidUpdate`, and `componentWillUnmount`. In functional components, `useEffect` replaces all of them.
✅ When and Why I Will Use `useEffect`:
* I will use `useEffect` when I want to run code after the component has rendered.
* I will also use it when I want to run something only once, like on initial page load — for that, I’ll use an empty dependency array.
* And if I want to run it when a value changes, I’ll add that value in the dependency array.
So, in short:
Whenever I need to perform a task outside the component’s render logic — I use `useEffect`.
`useEffect` এর মূল উদ্দেশ্য হলো React-এর functional component-এর মধ্যে side effects হ্যান্ডেল করা।
Side effect মানে এমন কাজ, যেটা কম্পোনেন্ট রেন্ডার হবার পরে বাইরে থেকে ঘটে। যেমন:
* API থেকে ডাটা আনা
* ইভেন্ট লিসেনার বসানো
* Document title আপডেট করা
* টাইমার চালানো
* অথবা component unmount হওয়ার সময় কোনো cleanup করা
আগে class component এ এসব কাজ করার জন্য `componentDidMount`, `componentDidUpdate`, আর `componentWillUnmount` ছিল। এখন আমরা এগুলা সব `useEffect` দিয়েই করতে পারি।
✅ কখন এবং কেন `useEffect` ব্যবহার করব:
* যদি আমি চাই কোনো কোড রেন্ডার হওয়ার পর চলুক, তাহলে `useEffect` ব্যবহার করব।
* যদি শুধু একবার চালাতে চাই, যেমন পেজ লোড হবার পর, তাহলে আমি empty dependency array দিব।
* আর যদি চাই কোনো স্পেসিফিক ভ্যালু পরিবর্তনে চলুক, তখন সেই ভ্যালুকে dependency array-তে দিব।
সংক্ষেপে বললে, যখনই রেন্ডার লজিকের বাইরে কোনো কাজ করতে হবে — আমি `useEffect` ব্যবহার করব।
JSX stands for JavaScript XML. It is a syntax extension for JavaScript that allows us to write HTML-like code inside JavaScript.
In React, instead of writing plain `React.createElement()` calls, we write UI code using JSX.
Behind the scenes, JSX is not HTML — it gets compiled into regular JavaScript using tools like Babel.
So, JSX makes the code easier to read and write, especially when dealing with complex UIs. It also supports embedding JavaScript expressions using curly braces inside the markup.
So in short:
* JSX helps write UI code in a cleaner, more readable way.
* It gets converted into JavaScript at build time.
JSX এর পূর্ণরূপ হলো JavaScript XML। এটা JavaScript-এর জন্য একটা syntax extension, যার মাধ্যমে আমরা HTML-এর মতো কোড JavaScript এর ভিতরেই লিখতে পারি।
React-এ UI বানানোর সময় আমরা JSX ব্যবহার করি।
JSX কোডকে Babel নামের একটি tool কম্পাইল করে React-compatible কোডে রূপান্তর করে।
JSX আমাদের কোডকে clean, readable, এবং সহজভাবে UI design করার সুযোগ দেয়। JSX-এর ভিতরে আমরা curly braces ব্যবহার করে JavaScript expressions-ও লিখতে পারি।
সংক্ষেপে:
* JSX দিয়ে আমরা HTML-এর মতো syntax-এ UI লিখি
* এরপর সেটা build time-এ JavaScript-এ রূপান্তর হয়
The React Component Lifecycle refers to the stages a component goes through from the time it is created, updated, and finally removed from the DOM.
This concept mainly applies to class components, because functional components use hooks instead.
There are three main phases in the lifecycle of a class component:
1. Mounting – When the component is being created and inserted into the DOM.
* `constructor()` – called first to initialize the component
* `render()` – returns the JSX
* `componentDidMount()` – called after the component is rendered for the first time; good for API calls or DOM manipulation
2. Updating – When the component re-renders due to state or props change.
* `shouldComponentUpdate()` – decides whether the component should update
* `render()` – called again
* `componentDidUpdate()` – runs after the update is done
3. Unmounting – When the component is being removed from the DOM.
* `componentWillUnmount()` – useful for cleanup (like clearing intervals, event listeners)
In functional components, we handle lifecycle with useEffect() hooks
React Component Lifecycle বলতে বোঝানো হয় — একটি কম্পোনেন্ট তার জন্ম (create) থেকে শুরু করে আপডেট (update) এবং শেষে ডিলিট (remove/unmount) হওয়া পর্যন্ত যে ধাপগুলো পার করে।
এই ধারণাটি মূলত class component-এর জন্য প্রযোজ্য। Functional component-এ আমরা lifecycle হ্যান্ডেল করি hooks দিয়ে।
React-এর lifecycle মূলত ৩টি ধাপে ভাগ করা যায়:
১. Mounting Phase – যখন component তৈরি হয়ে DOM-এ ঢোকে।
* `constructor()` – শুরুতে কল হয়, initial setup এর জন্য
* `render()` – JSX রেন্ডার করে
* `componentDidMount()` – প্রথমবার render হওয়ার পর কল হয়; এখানে API call বা DOM manipulation করা ভালো
২. Updating Phase – যখন props বা state চেঞ্জ হয় এবং component আবার রেন্ডার হয়।
* `shouldComponentUpdate()` – update হবে কিনা তা ঠিক করে
* `render()` – আবার রেন্ডার হয়
* `componentDidUpdate()` – আপডেট হয়ে গেলে কল হয়
৩. Unmounting Phase – যখন component DOM থেকে সরানো হয়।
* `componentWillUnmount()` – যেকোনো cleanup এর জন্য, যেমন interval clear, event listener remove ইত্যাদি
Functional component এ আমরা `useEffect()` দিয়ে এই lifecycle গুলা হ্যান্ডেল করি:
The purpose of a custom hook in React is to reuse logic across multiple components. When I notice that some logic — like handling forms, fetching data from an API, or tracking window size — is being repeated in multiple components, I move that logic into a custom hook to avoid repetition and keep my code clean.
A custom hook is simply a JavaScript function that uses one or more built-in React hooks like `useState`, `useEffect`, or others.
To create a custom hook:
* I give it a name that starts with “use”. This is required by React so it knows it’s a hook.
* Inside that function, I place whatever logic I want to reuse — like setting state, using effects, or any custom behavior.
* Then, I return whatever value or function I need from that hook.
* After that, I can import and use that hook in any component just like a regular built-in hook.
So instead of repeating the same logic in different components, I write it once inside a custom hook and reuse it wherever needed.
This improves readability, reusability, and maintainability of the code. React-এ custom hook ব্যবহারের উদ্দেশ্য হলো — যদি কোনো লজিক আমি বারবার একাধিক কম্পোনেন্টে ব্যবহার করি, তাহলে সেটা আলাদা করে একটা custom hook হিসেবে লিখে নেই, যাতে কোড পরিষ্কার থাকে এবং পুনরায় ব্যবহার করা যায়।
Custom hook আসলে একটা সাধারণ জাভাস্ক্রিপ্ট ফাংশন, যেখানে আমরা `useState`, `useEffect` বা অন্য কোনো built-in hook ব্যবহার করতে পারি।
Custom hook বানাতে হলে:
* প্রথমে আমি ফাংশনের নাম দেই "use" দিয়ে শুরু করে, যেমন `useForm` বা `useWindowWidth`। এটা React-এর নিয়ম।
* এরপর আমি ওই ফাংশনের ভিতরে আমার প্রয়োজনীয় লজিক রাখি — যেমন স্টেট ম্যানেজমেন্ট, API কল, বা DOM ইভেন্ট হ্যান্ডলিং।
* শেষে আমি যেটা দরকার, সেটা return করি — হতে পারে কোনো ভ্যালু, ফাংশন বা অবজেক্ট।
* এরপর আমি সেই hook-টা যেকোনো কম্পোনেন্টে গিয়ে ব্যবহার করতে পারি ঠিক built-in hook-এর মতো।
এইভাবে custom hook ব্যবহার করলে কোড হয় clean, reusable এবং organized।
A custom hook is simply a JavaScript function that uses one or more built-in React hooks like `useState`, `useEffect`, or others.
To create a custom hook:
* I give it a name that starts with “use”. This is required by React so it knows it’s a hook.
* Inside that function, I place whatever logic I want to reuse — like setting state, using effects, or any custom behavior.
* Then, I return whatever value or function I need from that hook.
* After that, I can import and use that hook in any component just like a regular built-in hook.
So instead of repeating the same logic in different components, I write it once inside a custom hook and reuse it wherever needed.
This improves readability, reusability, and maintainability of the code.
React-এ custom hook ব্যবহারের উদ্দেশ্য হলো — যদি কোনো লজিক আমি বারবার একাধিক কম্পোনেন্টে ব্যবহার করি, তাহলে সেটা আলাদা করে একটা custom hook হিসেবে লিখে নেই, যাতে কোড পরিষ্কার থাকে এবং পুনরায় ব্যবহার করা যায়।Custom hook আসলে একটা সাধারণ জাভাস্ক্রিপ্ট ফাংশন, যেখানে আমরা `useState`, `useEffect` বা অন্য কোনো built-in hook ব্যবহার করতে পারি।
Custom hook বানাতে হলে:
* প্রথমে আমি ফাংশনের নাম দেই "use" দিয়ে শুরু করে, যেমন `useForm` বা `useWindowWidth`। এটা React-এর নিয়ম।
* এরপর আমি ওই ফাংশনের ভিতরে আমার প্রয়োজনীয় লজিক রাখি — যেমন স্টেট ম্যানেজমেন্ট, API কল, বা DOM ইভেন্ট হ্যান্ডলিং।
* শেষে আমি যেটা দরকার, সেটা return করি — হতে পারে কোনো ভ্যালু, ফাংশন বা অবজেক্ট।
* এরপর আমি সেই hook-টা যেকোনো কম্পোনেন্টে গিয়ে ব্যবহার করতে পারি ঠিক built-in hook-এর মতো।
এইভাবে custom hook ব্যবহার করলে কোড হয় clean, reusable এবং organized।
To optimize a React JS application, I follow these techniques:
1. I use `React.memo` to avoid unnecessary re-rendering of components if their props haven’t changed.
2. I use `useCallback` to memoize functions and prevent them from being recreated on every render.
3. I use `useMemo` to cache expensive computations and avoid recalculating them unnecessarily.
4. I apply code splitting and lazy loading to load components only when needed, reducing initial load time.
5. I implement pagination or infinite scroll to fetch data in smaller chunks instead of all at once.
6. I use compressed and lazy-loaded images to improve image loading performance.
7. I always assign unique keys when rendering lists to help React track items efficiently.
8. I keep state local to the component when possible instead of using global state unnecessarily.
9. I use React DevTools and Profiler to detect and fix performance bottlenecks.
These steps help me make the application faster, more efficient, and user-friendly.
React অ্যাপ অপ্টিমাইজ করার জন্য আমি নিচের টেকনিকগুলো অনুসরণ করি:
1. আমি `React.memo` ব্যবহার করি যেন props না বদলালে component আবার রেন্ডার না হয়।
2. আমি `useCallback` ব্যবহার করি যেন ফাংশন বারবার recreate না হয়।
3. আমি `useMemo` ব্যবহার করি যাতে ভারী কাজ বারবার না চলে, আগেই ক্যালকুলেট করে রাখি।
4. আমি lazy loading এবং code splitting ব্যবহার করি যেন কম্পোনেন্ট প্রয়োজনে লোড হয়।
5. আমি pagination বা infinite scroll ব্যবহার করি যেন সব ডাটা একসাথে না এনে ধাপে ধাপে আনি।
6. আমি compressed এবং lazy-loaded image ব্যবহার করি যেন ইমেজ দ্রুত লোড হয়।
7. আমি unique key ব্যবহার করি list render করার সময় যেন React efficiently কাজ করতে পারে।
8. আমি local state রাখি যেখানে সম্ভব, যত্রতত্র global state এ না নিয়ে গিয়ে।
9. আমি React DevTools ও Profiler ব্যবহার করি পারফর্মেন্স সমস্যা খুঁজে বের করতে।
এইসব টেকনিক ব্যবহার করে আমি অ্যাপটিকে দ্রুত, স্মুথ এবং স্কেলযোগ্য রাখি।
In React, if I want to send data from a child to the parent, I can do it in two ways: lifting state up and using a callback function.
1. Lifting State Up:
It means I move the state from the child to the parent.
So, the parent creates the state and gives the child the value and the update function.
When something happens in the child (like user types something), the child calls the update function.
This way, the parent gets the new data and can update the state.
This helps when more than one child needs the same data.
2. Using Callback Function:
Here, I create a function in the parent and send it to the child as a prop.
When the child wants to send data to the parent, it just calls that function with the data.
Then the parent gets the data and uses it.
This is a simple and clean way to send data from child to parent.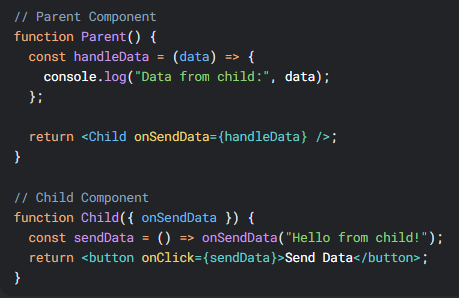
So, both lifting state up and callbacks help us to send data from child to parent in React.
React-এ যদি আমি child থেকে parent এ ডাটা পাঠাতে চাই, তাহলে দুইভাবে করতে পারি:
lifting state up এবং callback function দিয়ে।
১. Lifting State Up:
এর মানে হচ্ছে, আমি state টা child থেকে parent-এ নিয়ে যাই।
Parent কম্পোনেন্টে আমি state রাখি, আর child কে সেই state আর সেট করার function পাঠাই।
Child যখন কিছু পরিবর্তন করে, তখন সেই function কল করে।
এইভাবে parent ডাটাটা পায় এবং update করে।
এটা দরকার হয় যখন একাধিক child একই ডাটা শেয়ার করে।
২. Callback Function দিয়ে:
এখানে আমি একটা ফাংশন parent-এ বানাই এবং child-এ পাঠাই।
Child যখন parent কে ডাটা পাঠাতে চায়, তখন সে ফাংশনটা কল করে এবং ডাটা পাঠায়।
Parent সেই ডাটাটা পেয়ে কাজ করে।
এই দুইটা উপায় — lifting state up আর callback function — React-এ child থেকে parent এ ডাটা পাঠানোর জন্য সবচেয়ে সহজ ও কাজের উপায়।
The best way to send multiple props to a child component is to use an object.
Instead of sending many individual props, I can group them in an object and send that object as a single prop.
It keeps the code clean and easy to manage, especially when there are too many values to pass.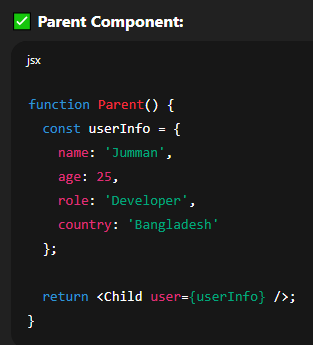
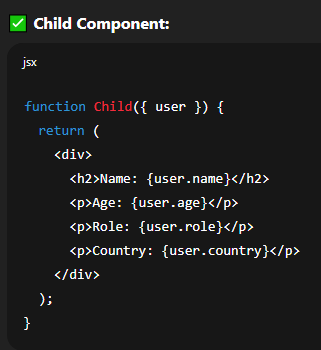 React-এ অনেকগুলো props পাঠানোর সবচেয়ে ভালো উপায় হলো — সব ভ্যালুগুলো একটা object-এর মধ্যে রেখে সেটা একটি prop হিসেবে পাঠানো।
এতে কোড পরিষ্কার থাকে এবং manage করতেও সহজ হয়।
Instead of sending many individual props, I can group them in an object and send that object as a single prop.
It keeps the code clean and easy to manage, especially when there are too many values to pass.
React-এ অনেকগুলো props পাঠানোর সবচেয়ে ভালো উপায় হলো — সব ভ্যালুগুলো একটা object-এর মধ্যে রেখে সেটা একটি prop হিসেবে পাঠানো।এতে কোড পরিষ্কার থাকে এবং manage করতেও সহজ হয়।
React Router DOM is a popular library in React that helps us to create navigation between different pages in a React application — without reloading the browser.
React itself is a single-page application, but using React Router DOM, we can build multi-page behavior.
With this library:
* I can create routes, like `/home`, `/about`, `/products`, etc.
* I can switch pages using components like `Link`, `Route`, `BrowserRouter`, and `Navigate`.
* It keeps the URL and the UI in sync, so the user feels like they are visiting real pages.
This helps us make SPA (Single Page Application) look and feel like a multi-page website, with smooth transitions and no full reload.
React Router DOM হলো React-এর একটি popular লাইব্রেরি, যেটা আমাদের অ্যাপে পেজের মধ্যে navigation বা চলাচল করতে সাহায্য করে, তাও আবার ব্রাউজার রিলোড ছাড়াই।
React স্বাভাবিকভাবে একটা single page application। কিন্তু React Router DOM ব্যবহার করে আমরা অ্যাপটাকে multi-page এর মতো বানাতে পারি।
এই লাইব্রেরি দিয়ে আমরা:
* আলাদা আলাদা route বানাতে পারি — যেমন `/home`, `/about`, `/contact`
* `Link`, `Route`, `BrowserRouter`, `Navigate` ব্যবহার করে এক পেজ থেকে আরেক পেজে যেতে পারি
* এটা URL আর UI এর সাথে sync করে, তাই user বুঝতেই পারে না যে এটা এক পেজের ভেতরে হচ্ছে
এইভাবে আমরা single page application-কে multi-page site এর মতো ইউজার ফ্রেন্ডলি করে তুলতে পারি।
In React, state is a way to store and manage data inside a component.
When the state changes, React automatically re-renders the component to show the updated data on the screen.
For example, if I have a counter app, I can store the count value in state. When I click a button to increase the count, the state updates, and React shows the new value.
In functional components, I use the `useState` hook to create and update state.
So, state helps us to build dynamic and interactive UI — where data can change based on user actions.
React-এ state হলো এমন একটি জায়গা, যেখানে আমরা কম্পোনেন্টের ভিতরের ডাটা সংরক্ষণ করি এবং নিয়ন্ত্রণ করি।
যখন state-এর মান বদলায়, তখন React নিজে থেকে সেই কম্পোনেন্টকে আবার রেন্ডার করে — মানে নতুন ডাটা স্ক্রিনে দেখায়।
যেমন, যদি আমি একটা কাউন্টার অ্যাপ বানাই, তাহলে count-এর মান state-এ রাখি। যখন আমি বাটনে ক্লিক করি, state আপডেট হয় এবং নতুন মান স্ক্রিনে দেখায়।
Functional component-এ আমরা `useState` hook ব্যবহার করে state বানাই এবং আপডেট করি।
State আমাদের ডায়নামিক এবং ইন্টারঅ্যাকটিভ অ্যাপ বানাতে সাহায্য করে।
Props drilling happens when we pass data from a top-level component to a deeply nested child component through many layers — even if some of the middle components don’t use that data.
For example, if I want to send some data from a parent to a grandchild, I must pass it through the child, even if the child doesn’t need it. This is called props drilling.
It can make the code hard to read and manage, especially in large applications.
To solve this, we can use tools like Context API or state management libraries like Redux, so we don’t need to pass props step by step.
Props drilling হলো এমন একটি সমস্যা, যেখানে আমরা parent থেকে অনেক নিচের একটা কম্পোনেন্টে ডাটা পাঠাতে চাই, কিন্তু আমাদের সেই ডাটা প্রতিটা মাঝখানের কম্পোনেন্টের মধ্য দিয়ে পাঠাতে হয় — যদিও তারা সেই ডাটা ব্যবহার করে না।
যেমন: আমি যদি parent থেকে grandchild-এ ডাটা পাঠাতে চাই, তাহলে আমাকে সেটা আগে child-এ পাঠাতে হবে, তারপর grandchild-এ।
এটাই হলো props drilling।
এতে কোড অনেক বড় হয়ে যায় এবং মেইনটেইন করাও কষ্ট হয়।
এই সমস্যা সমাধানে আমরা Context API বা Redux এর মতো টুল ব্যবহার করতে পারি, যেন সরাসরি যেই কম্পোনেন্ট দরকার, তাকে ডাটা পাঠানো যায়।
We inject dependencies inside the `useEffect` hook to tell React when to run the effect.
The dependency array is the second argument of `useEffect`. It lets React know what values to watch for changes.
* If a value in the dependency array changes, React will re-run the code inside useEffect.
* If nothing changes, React will not run it again.
This helps us avoid unnecessary runs and also keeps our code efficient and correct.
For example, if I pass `[count]` as a dependency, the effect will run only when `count` changes.
So, we inject dependencies to control when the effect runs and to prevent bugs or performance issues.
আমরা `useEffect` এর ভিতরে dependency array ব্যবহার করি যাতে React বুঝতে পারে — কখন effect চলবে।
এই dependency array `useEffect` এর দ্বিতীয় প্যারামিটার। এর মধ্যে আমরা যেসব ভ্যালু দেই, React সেগুলোর উপর নজর রাখে।
* যদি ওই ভ্যালুগুলোর কোনোটা বদলে যায়, তখন React আবার `useEffect` চালায়।
* আর যদি না বদলায়, তাহলে আর `useEffect` চালায় না।
এতে করে আমাদের কোড বিপর্যয় থেকে বাঁচে, অপ্রয়োজনীয় রান বন্ধ হয়, এবং পারফর্মেন্স ভালো থাকে।
উদাহরণ হিসেবে, যদি আমি dependency `[count]` দেই, তাহলে effect শুধুমাত্র `count` বদলালে চলবে।
তাই, dependency inject করার মূল উদ্দেশ্য হলো — control করা কখন effect চলবে।
`React.memo()` is a built-in function in React that is used to stop a component from re-rendering if its props haven’t changed.
Normally, when a parent component re-renders, all of its child components also re-render — even if their data (props) didn’t change. This can slow down the app.
When I wrap a component with `React.memo()`, React will check if the props are the same as before.
* If the props didn’t change, it will skip re-rendering.
* If the props changed, then it will re-render as usual.
I use `React.memo()` to improve performance, especially when I have large or slow components that don’t need to update every time.
`React.memo()` হলো React-এর একটা ফাংশন, যেটা ব্যবহার করি কম্পোনেন্ট অপ্রয়োজনীয় রেন্ডার হওয়া বন্ধ করতে।
সাধারণভাবে, যখন parent কম্পোনেন্ট রেন্ডার হয়, তখন তার সব child কম্পোনেন্টও রেন্ডার হয়—even যদি তাদের props না বদলায়।
কিন্তু আমি যদি কোনো কম্পোনেন্টকে `React.memo()` দিয়ে র্যাপ করি, তাহলে React দেখবে আগের props আর নতুন props একই আছে কি না।
* যদি না বদলায়, তাহলে React আর রেন্ডার করবে না।
* আর যদি বদলায়, তাহলে রেন্ডার করবে।
আমি `React.memo()` ব্যবহার করি অ্যাপকে দ্রুত করার জন্য, বিশেষ করে যখন বড় বা ধীরগতির কম্পোনেন্ট থাকে, যেগুলোর সব সময় রেন্ডার হওয়া দরকার নেই।
In React, there are two types of form components: controlled and uncontrolled.
🔹 Controlled Component:
A controlled component means the form input is fully controlled by React state.
* The value of the input comes from the state.
* Whenever the user types something, we update the state using `onChange`.
* The state holds the current value, not the DOM.
This way, React controls the data, and we can easily validate, reset, or track the input.
🔹 Uncontrolled Component:
An uncontrolled component means the input keeps its own value in the DOM, not in React state.
* We use a `ref` to read the value when needed.
* React doesn’t control the data — the browser does.
This is useful when we don’t need to track the input on every change.
🔹 Summary:
* Controlled = React handles the input using state.
* Uncontrolled = DOM handles the input, React uses ref to access the value.
React-এ দুই ধরণের form component থাকে: controlled এবং uncontrolled।
🔹 Controlled Component:
Controlled component মানে — input field এর মান React-এর state এর মাধ্যমে নিয়ন্ত্রিত হয়।
* Input-এর value আসে state থেকে।
* ইউজার কিছু টাইপ করলে, আমরা `onChange` দিয়ে সেই মান state-এ আপডেট করি।
* React সব সময় জানে input-এর ভ্যালু কী।
এইভাবে আমরা সহজে validation, reset বা tracking করতে পারি।
🔹 Uncontrolled Component:
Uncontrolled component মানে — input field এর মান ব্রাউজার নিজে রাখে, React না।
* আমরা শুধু ref দিয়ে মানটা পড়ি যখন দরকার হয়।
* এখানে React কন্ট্রোল করে না, DOM নিজেই ভ্যালু ম্যানেজ করে।
এই পদ্ধতি তখন ব্যবহার করি যখন input-এর মান প্রতি মুহূর্তে track করার দরকার নেই।
🔹 সংক্ষেপে:
* Controlled = React state দিয়ে input কন্ট্রোল হয়
* Uncontrolled = DOM নিজে input কন্ট্রোল করে, React শুধু value পড়ে
🔹 Controlled Component:
A controlled component means the form input is fully controlled by React state.
* The value of the input comes from the state.
* Whenever the user types something, we update the state using `onChange`.
* The state holds the current value, not the DOM.
This way, React controls the data, and we can easily validate, reset, or track the input.
🔹 Uncontrolled Component:
An uncontrolled component means the input keeps its own value in the DOM, not in React state.
* We use a `ref` to read the value when needed.
* React doesn’t control the data — the browser does.
This is useful when we don’t need to track the input on every change.
🔹 Summary:
* Controlled = React handles the input using state.
* Uncontrolled = DOM handles the input, React uses ref to access the value.
React-এ দুই ধরণের form component থাকে: controlled এবং uncontrolled।
🔹 Controlled Component:
Controlled component মানে — input field এর মান React-এর state এর মাধ্যমে নিয়ন্ত্রিত হয়।
* Input-এর value আসে state থেকে।
* ইউজার কিছু টাইপ করলে, আমরা `onChange` দিয়ে সেই মান state-এ আপডেট করি।
* React সব সময় জানে input-এর ভ্যালু কী।
এইভাবে আমরা সহজে validation, reset বা tracking করতে পারি।
🔹 Uncontrolled Component:
Uncontrolled component মানে — input field এর মান ব্রাউজার নিজে রাখে, React না।
* আমরা শুধু ref দিয়ে মানটা পড়ি যখন দরকার হয়।
* এখানে React কন্ট্রোল করে না, DOM নিজেই ভ্যালু ম্যানেজ করে।
এই পদ্ধতি তখন ব্যবহার করি যখন input-এর মান প্রতি মুহূর্তে track করার দরকার নেই।
🔹 সংক্ষেপে:
* Controlled = React state দিয়ে input কন্ট্রোল হয়
* Uncontrolled = DOM নিজে input কন্ট্রোল করে, React শুধু value পড়ে
In React, lifting state up means moving the state from a child component to its parent.
We do this when two or more child components need to share the same data, or when a child needs to send data to the parent.
Instead of keeping the state inside the child, we move it to the parent and pass it down as props.
The child can then send data back by calling a function given by the parent.
This way, the parent becomes the single source of truth, and the data stays in one place.React-এ lifting state up মানে হলো — child component থেকে state টা parent component এ নিয়ে যাওয়া।
এই কাজটা আমরা তখন করি যখন একাধিক child একই ডাটা শেয়ার করে, অথবা child থেকে parent এ ডাটা পাঠাতে হয়।
State কে child-এর ভিতরে না রেখে আমরা parent-এ রাখি এবং props দিয়ে নিচে পাঠাই।
Child তখন parent থেকে পাওয়া function কল করে উপরে ডাটা পাঠায়।
এইভাবে parent component ডাটার একমাত্র মালিক হয়, আর অ্যাপ clean এবং manageable থাকে।
We do this when two or more child components need to share the same data, or when a child needs to send data to the parent.
Instead of keeping the state inside the child, we move it to the parent and pass it down as props.
The child can then send data back by calling a function given by the parent.
This way, the parent becomes the single source of truth, and the data stays in one place.
React-এ lifting state up মানে হলো — child component থেকে state টা parent component এ নিয়ে যাওয়া।এই কাজটা আমরা তখন করি যখন একাধিক child একই ডাটা শেয়ার করে, অথবা child থেকে parent এ ডাটা পাঠাতে হয়।
State কে child-এর ভিতরে না রেখে আমরা parent-এ রাখি এবং props দিয়ে নিচে পাঠাই।
Child তখন parent থেকে পাওয়া function কল করে উপরে ডাটা পাঠায়।
এইভাবে parent component ডাটার একমাত্র মালিক হয়, আর অ্যাপ clean এবং manageable থাকে।
In React, components are of two types based on how they manage data: stateful and stateless.
🔹 Stateful Component:
A stateful component is a component that has state.
It can store and manage data, and it changes when the state changes.
For example, if I use `useState` inside a component, it becomes a stateful component.
These components are used when we need to handle dynamic data or user interaction.
🔹 Stateless Component:
A stateless component is a component that does not have any state.
It only receives data through props and displays it.
It doesn’t manage any internal data.
These are simple components — just used to show static content or UI layout.
🔹 Summary:
* Stateful = has state, dynamic
* Stateless = no state, only shows data
React-এ কম্পোনেন্টকে দুই ভাগে ভাগ করা যায়: stateful আর stateless — এটা নির্ভর করে তারা state ব্যবহার করে কি না।
🔹 Stateful Component:
Stateful component মানে, যেই কম্পোনেন্টের ভেতরে state থাকে।
এগুলো ডাটা ধরে রাখে, এবং state বদলালে কম্পোনেন্ট রেন্ডার হয়।
যেমন, যদি আমি `useState` ব্যবহার করি, তাহলে সেটা Stateful হয়ে যায়।
এগুলো ব্যবহার করি যখন ইউজার ইন্টারঅ্যাকশন বা ডাইনামিক ডাটা হ্যান্ডেল করতে হয়।
🔹 Stateless Component:
Stateless component মানে, যেই কম্পোনেন্টের নিজস্ব কোনো state নেই।
এরা শুধু props থেকে ডাটা নিয়ে সেটা display করে।
এগুলো সাধারণত UI দেখানোর জন্য বা static layout এর জন্য ব্যবহৃত হয়।
🔹 সংক্ষেপে:
* Stateful = state আছে, ডাটা বদলাতে পারে
* Stateless = state নেই, শুধু দেখায়
🔹 Stateful Component:
A stateful component is a component that has state.
It can store and manage data, and it changes when the state changes.
For example, if I use `useState` inside a component, it becomes a stateful component.
These components are used when we need to handle dynamic data or user interaction.
🔹 Stateless Component:
A stateless component is a component that does not have any state.
It only receives data through props and displays it.
It doesn’t manage any internal data.
These are simple components — just used to show static content or UI layout.
🔹 Summary:
* Stateful = has state, dynamic
* Stateless = no state, only shows data
React-এ কম্পোনেন্টকে দুই ভাগে ভাগ করা যায়: stateful আর stateless — এটা নির্ভর করে তারা state ব্যবহার করে কি না।
🔹 Stateful Component:
Stateful component মানে, যেই কম্পোনেন্টের ভেতরে state থাকে।
এগুলো ডাটা ধরে রাখে, এবং state বদলালে কম্পোনেন্ট রেন্ডার হয়।
যেমন, যদি আমি `useState` ব্যবহার করি, তাহলে সেটা Stateful হয়ে যায়।
এগুলো ব্যবহার করি যখন ইউজার ইন্টারঅ্যাকশন বা ডাইনামিক ডাটা হ্যান্ডেল করতে হয়।
🔹 Stateless Component:
Stateless component মানে, যেই কম্পোনেন্টের নিজস্ব কোনো state নেই।
এরা শুধু props থেকে ডাটা নিয়ে সেটা display করে।
এগুলো সাধারণত UI দেখানোর জন্য বা static layout এর জন্য ব্যবহৃত হয়।
🔹 সংক্ষেপে:
* Stateful = state আছে, ডাটা বদলাতে পারে
* Stateless = state নেই, শুধু দেখায়
Authentication and Authorization are two different things in web security.
🔹 Authentication:
Authentication means checking who the user is.
* It verifies the user's identity — like login with email and password.
* If the identity is correct, the user gets access to the system.
So, authentication answers the question:
👉 "Who are you?"
🔹 Authorization:
Authorization means checking what the user is allowed to do.
* After the user is logged in, authorization decides what pages, features, or actions the user can access — like admin panel or edit button.
* It depends on the user's role or permissions.
So, authorization answers the question:
👉 "What can you do?"
✅ In short:
* Authentication = Are you a valid user?
* Authorization = What are you allowed to access?
Authentication আর Authorization — এই দুইটা হলো আলাদা জিনিস, কিন্তু অনেকেই গুলিয়ে ফেলে।
🔹 Authentication (অথেনটিকেশন):
Authentication মানে হলো — আপনি কে, সেটা যাচাই করা।
* এটা দেখে আপনি ভ্যালিড ইউজার কিনা — যেমন: ইমেইল ও পাসওয়ার্ড দিয়ে লগইন।
* ঠিক থাকলে, আপনাকে অ্যাপে ঢুকতে দেয়।
সোজা কথায়, authentication জিজ্ঞেস করে:
👉 "আপনি কে?"
🔹 Authorization (অথোরাইজেশন):
Authorization মানে হলো — আপনি কী করতে পারবেন সেটা ঠিক করা।
* লগইনের পর, এটা দেখে আপনি কোন পেজ দেখতে পারবেন, কোন কাজ করতে পারবেন — যেমন: admin কি না, delete করতে পারবেন কি না।
* এটা নির্ভর করে আপনার role বা permission এর ওপর।
সোজা কথায়, authorization জিজ্ঞেস করে:
👉 "আপনি কী করতে পারবেন?"
✅ সংক্ষেপে:
* Authentication = আপনি ইউজার কিনা যাচাই
* Authorization = আপনি কী করতে পারবেন সেটার অনুমতি
In React, the diff algorithm is a method used to compare the old virtual DOM with the new virtual DOM.
React uses this to find out what has changed on the screen after a state or prop update.
Instead of re-rendering everything, the diff algorithm looks at the differences between the old and new trees, and updates only the parts that changed.
This makes React very fast and efficient.
The process of updating only the changed part is called reconciliation.
So, the diff algorithm is the smart system that helps React update the UI quickly and correctly, without reloading the full page.
✅ In Short:
* Diff Algorithm = compares old and new virtual DOM
* Updates only the changed part
* Makes React fast and optimized
React-এ diff algorithm হলো একটা পদ্ধতি, যেটা পুরানো virtual DOM আর নতুন virtual DOM এর মধ্যে পার্থক্য খুঁজে বের করে।
যখনই কোন state বা props আপডেট হয়, React পুরো UI রেন্ডার না করে, শুধু দেখে কোথায় পরিবর্তন হয়েছে।
এই পরিবর্তনগুলো React বের করে diff algorithm এর মাধ্যমে, তারপর শুধু ওই অংশটাই আপডেট করে।
এই পুরো প্রক্রিয়াটাকেই বলে reconciliation।
এইভাবে, React খুব দ্রুত ও স্মার্ট উপায়ে UI আপডেট করে — যেটা performance এর জন্য খুবই ভালো।
✅ সংক্ষেপে:
* ডিফ এলগরিদম = পুরনো এবং নতুন ভার্চুয়াল DOM তুলনা করে
* কেবল পরিবর্তিত অংশকে আপডেট করে
* রিঅ্যাক্টকে দ্রুত এবং অপ্টিমাইজড করে
In React, the `key` is a special prop that we use when showing lists of elements — like with `.map()`.
The `key` helps React find out which items are changed, added, or removed from the list.
If we don’t use a proper key, React may update the wrong item, which can cause bugs or wrong output.
A good key should be unique and fixed — for example, an `id` from the database.
Using `key` makes list rendering faster and more accurate.
✅ In Short:
* `key` helps React track list items
* It must be unique
* Makes performance better and prevents bugs
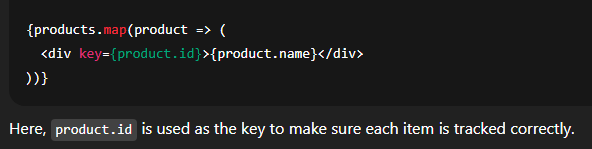 React-এ আমরা যখন list বা একাধিক item দেখাই, তখন প্রতিটা item-এ একটা `key` prop দিতে হয়।
এই `key` React-কে বুঝতে সাহায্য করে কোন item আপডেট হয়েছে, কোনটা এড হয়েছে, আর কোনটা ডিলিট হয়ে গেছে।
যদি ঠিকভাবে key না দেই, তাহলে React ভুল item আপডেট করতে পারে — তাতে bug বা ভুল দেখাতে পারে।
ভালো key হচ্ছে — unique (একটাই) আর fixed থাকা উচিত, যেমন: database-এর `id`।
`key` ব্যবহার করলে list ঠিকমতো রেন্ডার করে ও দ্রুত হয়।
✅ সংক্ষেপে:
* `key` React-কে item চিনতে সাহায্য করে
* এটা অবশ্যই unique হতে হবে
* এটা পারফরম্যান্স ভালো করে এবং bug কমায়
The `key` helps React find out which items are changed, added, or removed from the list.
If we don’t use a proper key, React may update the wrong item, which can cause bugs or wrong output.
A good key should be unique and fixed — for example, an `id` from the database.
Using `key` makes list rendering faster and more accurate.
✅ In Short:
* `key` helps React track list items
* It must be unique
* Makes performance better and prevents bugs
React-এ আমরা যখন list বা একাধিক item দেখাই, তখন প্রতিটা item-এ একটা `key` prop দিতে হয়। এই `key` React-কে বুঝতে সাহায্য করে কোন item আপডেট হয়েছে, কোনটা এড হয়েছে, আর কোনটা ডিলিট হয়ে গেছে।
যদি ঠিকভাবে key না দেই, তাহলে React ভুল item আপডেট করতে পারে — তাতে bug বা ভুল দেখাতে পারে।
ভালো key হচ্ছে — unique (একটাই) আর fixed থাকা উচিত, যেমন: database-এর `id`।
`key` ব্যবহার করলে list ঠিকমতো রেন্ডার করে ও দ্রুত হয়।
✅ সংক্ষেপে:
* `key` React-কে item চিনতে সাহায্য করে
* এটা অবশ্যই unique হতে হবে
* এটা পারফরম্যান্স ভালো করে এবং bug কমায়
JWT stands for JSON Web Token. It is a secure way to send user data between the client and the server.
It is mostly used for user authentication.
When a user logs in, the server creates a JWT using the user’s information (like ID or email) and sends it to the client.
The client then stores the token (usually in localStorage or cookie) and sends it with every request to prove who they are.
The server checks the token, and if it’s valid, it allows access to protected data or pages.
JWT is small, secure, and stateless, meaning the server does not need to store session data.
✅ In Short:
* JWT = JSON Web Token
* Used for authentication
* Token contains user data
* Sent with each request to prove identity
* No need for session storage on the server
JWT এর পূর্ণরূপ হলো JSON Web Token। এটি একটি নিরাপদ উপায় client ও server এর মধ্যে ইউজারের ডাটা আদান-প্রদান করার।
এটি মূলত authentication এর জন্য ব্যবহৃত হয়।
যখন ইউজার লগইন করে, তখন server একটি JWT বানায় — যার মধ্যে ইউজারের তথ্য (যেমন ID, email) থাকে — এবং client কে পাঠিয়ে দেয়।
Client সেই টোকেনটা localStorage বা cookie-তে রেখে দেয় এবং পরবর্তী সব request-এর সাথে সেই টোকেন পাঠায়।
Server সেই টোকেন যাচাই করে, এবং টোকেন সঠিক হলে protected data দেখতে দেয়।
JWT হচ্ছে ছোট, নিরাপদ, এবং stateless, মানে server-এ কোনো session data রাখা লাগে না।
✅ সংক্ষেপে
* JWT = JSON Web Token
* এটি সাধারণত authentication-এর জন্য ব্যবহৃত হয়
* টোকেনে ইউজারের তথ্য থাকে
* প্রতিটি request-এর সঙ্গে token পাঠানো হয় ইউজারের পরিচয় প্রমাণ করার জন্য
* Server-এ session data রাখার দরকার হয় না (stateless system)